
Hi guys! It's been a very long absence from me. Let's just say that I got plenty work from college al'right. Okay so this will be my first tutorial/tips of editing in Photoshop. I'm sure most beginners in Photoshop will use the Levels tool when it comes to increasing the brightness or contrast of the photo and I admit it's a pretty useful tool in Photoshop. However, today I would like to talk about the Curves tool. Basically, Curves is another tool that you can increase the brightness or apply contrast to a photo, which is similar to the Levels tool. In addition, I believe the Curves tool can give a lot of control when it's about enhancing your photo in Photoshop. With curves you are able adjust the over - all contrast or tonal range, adjust the local contrast and adjust the colour.
Overview
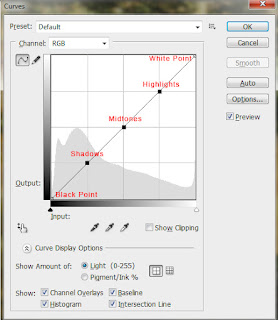
You start by changing the brightness values by clicking once somewhere on the line. This will then be selected as a "point"; the point can now be moved by dragging the point to a different place within the grid; which causes the tonal value to change either lighter or darker depending on whether you drag it up or down. The reason it's a curve is so that the change blends smoothly throughout the photo. A sudden change in value can be noticed very easily. The increasingly gradual change of the brightness values on either side of the change gives a very smooth and lots of adjustment control.
Note: However, that you can't increase contrast in one region without decreasing it in another. The curves
tool recreates contrast. Therefore think of the image having a contrast budget and you need to decide how it best suits your photo.
Quick Tip
If you want to keep the effects on adjustment or in a separate layers to enable quick adjustment during the process, go to Layers > New Adjustment Layer > Curves and it will appear at you layers palette.
S-Shape Curves
The S-Shape Curve is probably a curve mostly used by anyone in Photoshop. This S-Shape Curve adds contrast to the midtones whilst increasing the highlights and decreasing the shadows. You could also try the opposite, which lights the shadow and darks the highlight.
Often in photography, it's difficult to expose you image perfectly. Brightness or darkness can benefit from optimization. The S-Shape Curve is often useful in these cases - not to mention, quick and simple.
Here's some examples:
 |
 |
Tonal Range
One very useful and important function of curves is you could increase the tonal ranges with the black and white point. Sometimes in the histogram edges (blacks and whites) or gaps in between (shadows, midtones, and highlights). An under exposed image can be helped by pulling in the black and white points to correct the exposure or increase the tone.
Or if there are gaps in between the tonal peaks you can decrease contrast in specific parts of your image - thereby loosing up the contrast to be used in the more visible areas of your photo.
Here's an example:


Apply Tone
Curves allows you to apply colour tone to your photo. Basically, you have to go each colour from the RGB format. In order to do that, near "Channel" you will see the "RGB" and click that you can select each part from RED, GREEN or BLUE to apply tone. Other than that, you could also correct you colour balance with the RGB channel.

Any adjustments upward of the diagonal line in the red channel increase the red in the image. Lowering, below the diagonal line, increases the cyan. The other channels are the same: Upward in the green channel, green; lower, magenta. Upward in the blue channel, blue; lower yellow.


As you can see the colours of the photo is very warm. What I did was increase the Reds, did a S-Shape Curve at Green and did a S-Shape Curve at Blue.You can see in the photo above that there is a slight yellow-ish cast in the color tone. Not to mention, the image is slightly exposed out (over exposed). Plus, the contrast of the photo suits well with the photo.
Blending Modes
Also, curves adjustment layers (Layer>New Adjustment Layer> Curves) can be set to make curves only apply to a channel – such as Color and/or Luminosity – which allows for further, varied control. Another benefit is that it can make your adjustments more subtle through use of the opacity controls for the layer.
 |
| Original Photo. |
 |
| Blending Mode : Color |
 |
| Blending Mode : Lumiosity |
Notes
Practice makes perfect. The more you use the tools and techniques available to you the better you’ll get, improve your photography, and have fun.
Here are some things to remember when using the curves tool:
- Minimize use of the curves tool, as anything which stretches the image histogram increases the possibility posterization.
- Avoid the use of the curves tool on an already altered image.
- For extreme levels of color correction, consider applying curves using LAB mode (I'll post about it soon or later).
No comments:
Post a Comment