Photoshop 101 | Black & White

© Safuan Shahril | House of Parliament | London

Hi everybody! As you know that the year 2011 is coming to an end but the best part we'll be looking forward to a new year of 2012. I'm sure everybody feels time flies away and us as a photographer would like to think we have learn and polished our skills in photography. But knowledge will never stop and we must learn new knowledge in order to succeed at what you want. So this post is going to be about quick ways to apply Black & White effect in Photoshop.


A quick glance through any photography or fashion magazine, or at the photos on social websites like Flickr, confirms that black and white photography is as popular as ever. With the coming of digital though, one important thing has changed. In the days of film photography, you shot on black and white film. Now, with digital cameras, you take photos in colour and then convert them to black and white.


Converting to black and white digitally has a number of advantages. With film, the black and white conversion essentially happened at the time of shooting. If you wanted to change the nature of the black and white conversion, you could only do it by placing a coloured filter on the lens (a red filter, for instance, makes blue skies much darker).


Now, by starting with a colour photo and converting it to black and white in Photoshop, you have complete control over the conversion. Darkening a blue sky is easy, once you know how, and you can decide exactly how dark you want it to be.


Most digital SLRs (and some compacts) have a black and white mode. The camera is making the conversion for you, and the results are usually poor, giving flat, washed out photos. Avoid this mode, and use the following techniques instead.

Street Photography | London Eye


© 2011 Safuan Shahril | Street Photography | London Eye

"Pictures, regardless of how they are created and recreated, are intended to be looked at. This brings to the forefront not the technology of imaging, which of course is important, but rather what we might call the eyenology (seeing)." 
Henri Cartier-Bresson


Photoshop 101 | Curves

Hi guys! It's been a very long absence from me. Let's just say that I got plenty work from college al'right. Okay so this will be my first tutorial/tips of editing in Photoshop. I'm sure most beginners in Photoshop will use the Levels tool when it comes to increasing the brightness or contrast of the photo and I admit it's a pretty useful tool in Photoshop. However, today I would like to talk about the Curves tool. Basically, Curves is another tool that you can increase the brightness or apply contrast to a photo, which is similar to the Levels tool. In addition, I believe the Curves tool can give a lot of control when it's about enhancing your photo in Photoshop. With curves you are able adjust the over - all contrast or tonal range, adjust the local contrast and adjust the colour. 


Overview

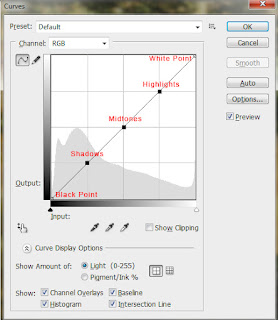
This is how the Curves tool looks like in Photoshop. As you can see I've point out each part of the Curves. The point form the top (right) to the bottom (left) affects the whites, highlights, midtones, shadows and the blacks of the photo. Therefore, by moving the positions of the point will create tone to the photo. Leaving the lines in the centre will not alter any effect to your photo.

You start by changing the brightness values by clicking once somewhere on the line. This will then be selected as a "point"; the point can now be moved by dragging the point to a different place within the grid; which causes the tonal value to change either lighter or darker depending on whether you drag it up or down. The reason it's a curve is so that the change blends smoothly throughout the photo. A sudden change in value can be noticed very easily. The increasingly gradual change of the brightness values on either side of the change gives a very smooth and lots of adjustment control.

Note: However, that you can't increase contrast in one region without decreasing it in another. The curves
tool recreates contrast. Therefore think of the image having a contrast budget and you need to decide how it best suits your photo.


Quick Tip
If you want to keep the effects on adjustment or in a separate layers to enable quick adjustment during the process, go to Layers > New Adjustment Layer > Curves and it will appear at you layers palette.